Missing coolant (long post)

Trip

New Member
Got a little of a dilemma what to do with this block of metal i have in the grage. (long post)
I had originally rebuild my engine with the main following parts:

Crank checked and balanced with JUN flywheel
ACL bearings
Rods checked and weight balanced
ARP rod bolts
ARP head bolts
JE pistons 86.5
HKS 1.2mm Gasket
Blocked checked, faced, bored and honed for pistons
Head de-assembled, checked and faced. Build it all with new parts, excluding cams and cam brackets. 3 angle valve job. Valves are original 54c size.

The engine turned out good and did the running-in without any problems. I changed the running-in oil/filter 3 times and finally to Silkolene Pro S 10w-50 ready to race.

After the first race which consists of 4 x 1minute runs, the engine started smoking drastically and coolant was almost finished from expansion tank. I first thought it was the turbo (GT2871R) since car was coming at full boost (10-12psi) at 5000rpm. Changed turbo but the symptoms remained.

With a lot of help and advise from Bob, I replaced the ARP head studs with the old OE I had without removing the head. This proved a success at first with no evident smoke from exhaust. But after leaving the car to cool down there was around an inch+ of coolant missing from the expansion tank. Filled it up again and repeated the test for 5 times. And every time coolant was missing. Strangely I didn’t find where the coolant was going. I had no coolant underneath the engine neither did I have steam/mist coming up. There was no evident of white smoke coming from exhaust either but i could have had just a faint mist I couldn’t see with my eyes. Oil was clean with no traces of coolant or mayo. Bubbles were coming out from the radiator though.

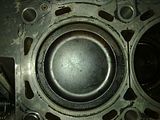
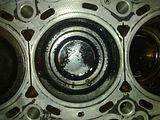
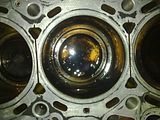
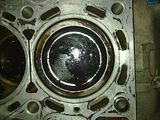
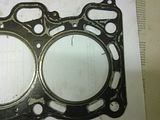
I decided to remove head and check the gasket. Cylinder 1 was dry, No2 was a little wet, No3 had oil, and No4 was like No2. Gasket was not in a good state either. See pics below


Replaced the gasket with a Cosworth 1.2mm and used the same old OE bolts. Bolted everything in place and retested. Yet again, Identical same results. I performed a compression test and it showed 160psi, 161psi, 165psi, 160psi. (pics below) Time was running out. I simple dropped the whole engine with gearbox and replaced it with a standard lump until the race season is over.


Race season is over and decided to give it another try. I took the head to the engineer to test it out. It came back with a straight face and he even told me it didn’t leak (whatever that means).
I will take the block next but I really doubt its warped or anything of the sort.

I am thinking that the first time the ARP head studs were to blame and the second and third time the OE old bolts were stretched enough not to fully torque the head down.

Any suggestions what else could it be ? I was hoping to start the season with at least 1 bar of boost :)
 

MarkTurbo

Well-Known Member
Trip;450115 But after leaving the car to cool down there was around an inch+ of coolant missing from the expansion tank. Filled it up again and repeated the test for 5 times. And every time coolant was missing. Strangely I didn’t find where the coolant was going. I had no coolant underneath the engine neither did I have steam/mist coming up[/QUOTE said:
I've just had a similar problem with my car on the testing day i did over christmas. I was losing a small amount of water everytime i went out and didnt have a clue where it was going. Then after coming into the pit area after a run i noticed a small puff of steam from under the bonnet. Thought to start with it was a split water hose somewhere but it turned out to be the rubber seal on the radiator cap. I guess once the water temps got up pressurizing the system it was allowing it to leak out past the cap.
 

Trip

New Member
I wish it was that simple :)

I had originally placed a film of plastic on top of the engine so i can capture any steam/mist but it turned out dry. with the standard engine i am using the same hoses, radiator and cap and after 3 full races no coolant was lost :)
 

Trip

New Member
Just to add, my oil to coolant cooler were blocked and removed, heater inlet/outlet were blocked and removed and even the coolant hoses connected to the back of inlet were blocked and removed.
 
P

pulsarboby

Guest
its a bit of a weird one is that ev : /
from the photos you have put up the block appears to be ok between the cylinders with no distortion.
have you tried running a straight rule across it diagonally to check for warpage and/or twist?

if the heads been leak tested and all come back ok then i can only assume that its the block itself.

im assuming you have checked the thermostat and rad to make sure they are both functioning correctly?
 

red reading

Active Member
Did you have the oil pump cover skimed with the block?

And looking at your picture's i would say that you either didnt torque down the head enough or in the correct sequence,when i torque them down i then walk off have a cigarette and a cup of tea i then go back and go to the highest torque setting specified.

Has your torque wrench been calibrated recentley?
 

Trip

New Member
its a bit of a weird one is that ev : /
from the photos you have put up the block appears to be ok between the cylinders with no distortion.
have you tried running a straight rule across it diagonally to check for warpage and/or twist?

if the heads been leak tested and all come back ok then i can only assume that its the block itself.

im assuming you have checked the thermostat and rad to make sure they are both functioning correctly?
I will be taking the block to the engineer so he will check the surface and if the bores are perfectly round. I did replace the thermostat with a new one(nismo) for piece of mind and both the thermostat housing (with thermostat in place) and rad ran perfectly on the standard engine.

I turned the crank and the bores are not scratched but piston3 is very clean compared to the others.

I also checked that the head bolt thread in the block are free and clean. I managed to turn freely with just my hand the head bolts in the block and all bolts went down around 10mm lower the height of the head.
 

Trip

New Member
Did you have the oil pump cover skimed with the block?

And looking at your picture's i would say that you either didnt torque down the head enough or in the correct sequence,when i torque them down i then walk off have a cigarette and a cup of tea i then go back and go to the highest torque setting specified.

Has your torque wrench been calibrated recentley?
Block was not skimmed with it pump in place but its lower then the block by around 1mm. I checked it with my steel ruler and it seems all the oil pump surface is lower but the engineer will check with a proper straight edge. Is it a problem if the oil pump is lower ?

The head was originally torqued down by my mechanic using ARP studs and he followed the instructions on the paper inside the box. If i remember correctly he torqed them down 10 more but i forgot if they were N/m or ft/lbf.

I only used the torque wrench when I install the gearbox to engine, oil housing, transfer case etc. How do you calibrate it ?

when I re did the head bolts i did follow the manual sequence and in order but I did not wait after every sequence. I gave them an extra 30deg to finish off.

I really hope its just a torque error. I will get another torque wrench (different make) and torque them against each other to see if they click together.
 
Last edited:

Trip

New Member
Contrary to what i just read on another thread, my expansion tank did never overflow and hoses were not under any high pressure.

this is piston 3
 

PobodY

Moderators
Staff member
I was loosing coolant for a while. It turned-out that one of the hose clamps wasn't tight enough, so when the pressure built it would vent rather than go into the expansion bottle.
 

Trip

New Member
Took the block to engineer to check it,

he pointed that i have a very slight "lip" which can only be felt when passing a sharp edge on it. But he said its so small that with a metal gasket there is a remote chance it won't seal properly. With a normal gasket it shouldn't be a problem.

This was on cyl1 between cyl1 and cyl2 (image) . When i originally diagnosed this problem cyl1 was the dryest i found and the problem looked like its coming from cyl3 area (as can be seen from the pics i posted in first post).

He also mentioned that the problem occurred on cyl3 from its discolouration and most likely the head bolt torque/method were to blame.


Should i dismantling the bottom end to bare block, and take it back to him for a light skim or should i risk it (since the original problem wasn't coming from cyl1) and make sure i get the head torqued right ?


I am not pressed by time. I am only worried about my know-how in dismantling and rebuild it myself + special tools needed which i do not have.
 
Last edited:

Trip

New Member
Out of curisity, Is it normal for the gasket to leave a black resedue on the perimiter of the cylnders as seen on the pic ?
 
P

pulsarboby

Guest
Out of curisity, Is it normal for the gasket to leave a black resedue on the perimiter of the cylnders as seen on the pic ?

thats normal, the silicone type substance is an aid to cold sealing before running temps are reached, this is why (if reusing a steel h/g) you give them half a dozen coats of hairspray to aid coldseal.

as for the block itself....its a tricky one to answer, if you put it back and it still lesaks then its all apart again but on other hand it may not need a skim.

i think if it were me i would get a perfectly flat piece of wood (around 6'' in diameter) or a manual block decker and wrap some 400 wet n dry round it and lightly sand the block face (after spraying it lightly with some celloluse paint) and providing you run along the lengh of the block but not over the edges you will see for yourself if there are any low spots, so just keep rubbing till all paint has dissapeared, crude but effective lol
 

Trip

New Member
Thanks for all the replies gents.

Having the engine out and already seperated from head and all other ancillaries, i decided it wasn't worth the time and effort putting it back to find it still leaks. And as danny said, it can/will (sooner or later) be my weakest point.

So i got going to dissamble whats left of it.

Some questions here.
How do I block the crank turning to undo the pulley and flywheel bolts ? I already removed the main bolts but i guess i would need to put them back in (to keep crank in its place) to undo the pulley and flywheel.

Do i remove the crank with rods and pistons still attached or should i disconnect the rods from the crank first ?

Do i need a special tool to remove the pistons ?

Progress
 

vss irvine

Well-Known Member
remove the rods from the crank, the only special tool you need is the wooden handle of a hammer to push the pistons down.

you can put 2 flywheel bolts in the crank and use a bar between then to hold the crank. ( make sure they are screwed in a fair bit) you may need someone to help you.

(obviously if you can borrow an impact gun this would be easier)
 
Last edited:

Trip

New Member
So Basically you first hold the crank from the pulley side to remove the flywheel bolts. You then screw to flywheel bolts to the crank (with flywheel), use a bar between them to remove the pulley nut.

It looks like the pulley bolt will be the hardest to remove since the torque value is 142-152Nm (flywheel bolts are 127-137Nm)

Thanks
 

Trip

New Member
Correct. I did mean to say without flywheel but i guess my typing and my brain where not in sync.
 

Trip

New Member
Block is fully stripped and going to engineer tomorrow :)

labeled everything so i can put everything back the way i took it. Should i change the crank and/or rod bearings (they have very minor wear marks on them), what about the main bolts ?
 
Top