View attachment 1627
Provided by GINGA
Right then as promised")
At this point I must add that this is for the uprated fuel pump supplied by Hiteq so may be different from other makes
The new pump kit

Tools you will need are
10mm socket
exstension bar
Ratchet
philips and flat bladed screw drivers
wire strippers and crimpers
2 straight electrical contectors
Make sure you've got as little fuel as possible in the tank before you start you see why later
First off disconnect the battery
Loosen or remove the fuel cap
Next remove the boot carpet on the lefthand side of the boot you will see a large metal plate held down with 5 10mm bolts and a wiring harness going into it,see below

With the cover plate removed you will see a large cover/cap on top of the fuel tank with 3 pipes going into it and two wiring connectors

,remove the large breather hose that is above it and place out of the way,remove the two wiring connectors from the cap and disconnect the third one that goes down the side of the tank you can then position the metal cover and loom out of the way,remeber/mark which pipes go where then loosen the fuel pipe clips and remove the pipes from the cap but beware these pipes are very tight(stuck) on the connectors and will be a pain to remove also there maybe some fuel pressure in the pipe on the left still so be prepared for some spillage then remove the large plastic lock nut that holds the cover/cap down by turning it anticlockwise I found it best to knock it round with a large screw driver.

Know clean off as much dirt as you can from the cap etc to avoid anything dropping into the tank then lift the cap off(make sure rubber sealing ring doesn't fall in tank , attached to this you will find two hoses and two electrical connectors,disconnect the 2 pipes from the cap remembering which goes where and disconnect the 2 wire plug that goes down to the fuel pump and place the cap out of the way and can also disconnect the other wiring from the cap that goes down to the fuel level sender if you like,you can know see down in the tank and realise that everything anybodys told you about changing the fuel pump is a lie and its not going to be as easy as everybody makes out

If you look down through the hole towards the front of the tank you will see the fuel pump retained in its holder attached to the base of the tank and wonder how the hell you get that outit was at this point I forgot to take pictures so sorry about that what you can see in the picture above is the mounting for the fuel pump carrier
Now to remove the fuel pump I removed the top section of the carrier by wiggling it and pushing it backward(IIRR)either way it will only come off one way,then I just lifted the pump out of the carrier and out of the tank,make sure you retrieve the 2 rubber ends that position the pump in the carrier,the lower part of the carrier can know be slide out of its mounting(towards the back) and removed from the tank,also on mine it had a antisurge tray attached to the back of the fuel pump which prevented me removing the pump and carrier in one go as it caught on the mounting bracket,this tray didn't look like a standard fitment :? so might not be yours,if it is remove it from the tank aswell.
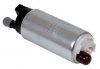
The old Fuel pump

Now attach the new fuelpump pick up supplied in the kit to the new pump and secure with the retaining washer/clip supplied.
Now with everything removed you can fit the new pump into the carrier using the rubber ends from the old pump,the new pump is a bit slimmer than the old one but is supplied with a foamy overcoat thing to slide over the pump to increase the width,then put the rubber end covers over the ends of the pump and fit into the carrier,the rubber ends are moulded to fit into the carrier so can't really be put round the wrong way then refit the carrier top section to hold the pump in place,I then just slipped the antisurge tray between the fuel pickup and the carrier so you should end up with something like this.

Now comes the bit where you start to worry
cut the orginal wiring off the old pump about 3" away from it and connect to the new pumps wiring harness which comes with it trying to keep the harness about the same lenght as the original,I used 2 straight blue electrical connectors to do this,on the old pumps wiring the two wires were black/red and black the black/red one is your positive and is to be connected to the red wire of the new harness and the black to the black.
(Bet your now thnking about electrical wiring floating around in a tank full of highly flamable petrol:
You should know have something like this

Refit the orginal fuel pipe to the new pump and your ready to fit the assembly back in again,to do this just put the whole thing back into the tank and slide the carrier back into its mounting bracket on the base of the tank,then push the antisurge tray down to make sure it sits on the base of the tank.
Then reconnect the pipes to the cap,the pipe from the pump goes to the lefthand connector of the cap and the fuel return pipe that is connected to the tray on mine(see pics) goes to the other(plastic) one.
Refit the electrical connectors to the cap and refit the cap with its rubber seal making sure it all seated properly,then fit and tighten down the lock ring and reconnect all the pipes and connectors etc but leave the metal cover off for now
Now reconnect the battery.
Refit/tighten the fuel cap.
Now find a gullible person to turn the ignition on while your standing a safe distance away now check all the pipes for leakage and if all ok,get same gullible person to start the engine then recheck for leaks again,leave running for a while just to make sure then if all is ok refit the metal cover etc and your done,you can now sit down a have a nice cold beer to chill out after the stress of wondering whether your car will explode when you start it up
now I would just like to point out (as if it wasn't obvious)that electricity and petrol don't mix so unless your feeling very confident get someone who knows what there doing to do the job for obvious reasons
Provided by GINGA
Right then as promised
At this point I must add that this is for the uprated fuel pump supplied by Hiteq so may be different from other makes
The new pump kit
Tools you will need are
10mm socket
exstension bar
Ratchet
philips and flat bladed screw drivers
wire strippers and crimpers
2 straight electrical contectors
Make sure you've got as little fuel as possible in the tank before you start you see why later
First off disconnect the battery
Loosen or remove the fuel cap
Next remove the boot carpet on the lefthand side of the boot you will see a large metal plate held down with 5 10mm bolts and a wiring harness going into it,see below
With the cover plate removed you will see a large cover/cap on top of the fuel tank with 3 pipes going into it and two wiring connectors
,remove the large breather hose that is above it and place out of the way,remove the two wiring connectors from the cap and disconnect the third one that goes down the side of the tank you can then position the metal cover and loom out of the way,remeber/mark which pipes go where then loosen the fuel pipe clips and remove the pipes from the cap but beware these pipes are very tight(stuck) on the connectors and will be a pain to remove also there maybe some fuel pressure in the pipe on the left still so be prepared for some spillage
then remove the large plastic lock nut that holds the cover/cap down by turning it anticlockwise I found it best to knock it round with a large screw driver.
Know clean off as much dirt as you can from the cap etc to avoid anything dropping into the tank
then lift the cap off(make sure rubber sealing ring doesn't fall in tank , attached to this you will find two hoses and two electrical connectors,disconnect the 2 pipes from the cap remembering which goes where and disconnect the 2 wire plug that goes down to the fuel pump and place the cap out of the way and can also disconnect the other wiring from the cap that goes down to the fuel level sender if you like,you can know see down in the tank and realise that everything anybodys told you about changing the fuel pump is a lie and its not going to be as easy as everybody makes out
If you look down through the hole towards the front of the tank you will see the fuel pump retained in its holder attached to the base of the tank and wonder how the hell you get that out
it was at this point I forgot to take pictures so sorry about that what you can see in the picture above is the mounting for the fuel pump carrier Now to remove the fuel pump I removed the top section of the carrier by wiggling it and pushing it backward(IIRR)either way it will only come off one way,then I just lifted the pump out of the carrier and out of the tank,make sure you retrieve the 2 rubber ends that position the pump in the carrier,the lower part of the carrier can know be slide out of its mounting(towards the back) and removed from the tank,also on mine it had a antisurge tray attached to the back of the fuel pump which prevented me removing the pump and carrier in one go as it caught on the mounting bracket,this tray didn't look like a standard fitment :? so might not be yours,if it is remove it from the tank aswell.
The old Fuel pump
Now attach the new fuelpump pick up supplied in the kit to the new pump and secure with the retaining washer/clip supplied.
Now with everything removed you can fit the new pump into the carrier using the rubber ends from the old pump,the new pump is a bit slimmer than the old one but is supplied with a foamy overcoat thing to slide over the pump to increase the width,then put the rubber end covers over the ends of the pump and fit into the carrier,the rubber ends are moulded to fit into the carrier so can't really be put round the wrong way
then refit the carrier top section to hold the pump in place,I then just slipped the antisurge tray between the fuel pickup and the carrier so you should end up with something like this.
Now comes the bit where you start to worry
cut the orginal wiring off the old pump about 3" away from it and connect to the new pumps wiring harness which comes with it trying to keep the harness about the same lenght as the original,I used 2 straight blue electrical connectors to do this,on the old pumps wiring the two wires were black/red and black the black/red one is your positive and is to be connected to the red wire of the new harness and the black to the black.
(Bet your now thnking about electrical wiring floating around in a tank full of highly flamable petrol:
You should know have something like this
Refit the orginal fuel pipe to the new pump and your ready to fit the assembly back in again,to do this just put the whole thing back into the tank and slide the carrier back into its mounting bracket on the base of the tank,then push the antisurge tray down to make sure it sits on the base of the tank.
Then reconnect the pipes to the cap,the pipe from the pump goes to the lefthand connector of the cap and the fuel return pipe that is connected to the tray on mine(see pics) goes to the other(plastic) one.
Refit the electrical connectors to the cap and refit the cap with its rubber seal making sure it all seated properly,then fit and tighten down the lock ring and reconnect all the pipes and connectors etc but leave the metal cover off for now
Now reconnect the battery.
Refit/tighten the fuel cap.
Now find a gullible person to turn the ignition on while your standing a safe distance away
now check all the pipes for leakage and if all ok,get same gullible person to start the engine then recheck for leaks again,leave running for a while just to make sure then if all is ok refit the metal cover etc and your done,you can now sit down a have a nice cold beer to chill out after the stress of wondering whether your car will explode when you start it up now I would just like to point out (as if it wasn't obvious)that electricity and petrol don't mix so unless your feeling very confident get someone who knows what there doing to do the job for obvious reasons
Attachments
-
 4.2 KB Views: 0